| Description | Peer-to-Peer Campaigns
Full User Guide
- General Overview
- Getting Started: The Setup Wizard
- Navigating the Campaign Dashboard
- Editing a Campaign
- Recruiting and Empowering Fundraisers
- The Approval Process
- Bringing It All Together
- Tracking Fundraiser Success: Reports
- Notifications
- Appendix A: Sample Instructions for Fundraisers
1. General Overview
Before we embark on creating a peer-to-peer campaign, it’s helpful to understand why a peer-to-peer campaign is valuable and what we are aiming to end up with.
Why peer-to-peer?
Every organization is unique and will have different ways of running their fundraising campaigns. But if we’re speaking generally, peer-to-peer campaigns allow your organization to involve their closest supporters in a very important activity: financially sustaining your organization and its initiatives. Your peer-to-peer campaign is a two-layer project: first, you recruit and empower fundraisers, and second, those fundraisers solicit donations to your organization from their networks. But peer-to-peer is not about your fundraisers doing all your tough development work for you. On the contrary, the more preparation you do for your fundraisers, the more successful their campaigns will be. But the effort will be worth it, because you will be deploying real people who have a real passion for your mission and, as a result, you will gain access to their like-minded friends, family, and co-workers.
How does it work?
You will be creating the following campaign assets:
I. Tools for recruiting fundraisers:
- a campaign landing page
- an email and social post template to announce your campaign
II. Templates for fundraisers:
- an individual fundraising page
- an email and social post to attract donors
- an email and social post to thank donors
The setup wizard will help you create these assets quickly, but you may want to spend some time editing them to make sure they are exactly how you want them. You’ll be able to continue editing everything from the campaign dashboard after you complete the wizard.
2. Getting Started: The Setup Wizard
The campaign setup wizard is a multi-step process. Follow the instructions and use the helpful hints (marked by the “?” icon) to guide you.
The wizard takes your through two main stages of building a campaign: 1) creating assets for you to communicate with your fundraisers and 2) creating tools for your fundraisers to communicate with their donors.
The key to your content will be filling out the “mad libs” style fields. There are four of these: beneficiaries, summary of the problem, specific impact, and ultimate end result. When filling these fields out, think of your organization in general, as well as the specific project you are raising funds toward.
3. Navigating the Campaign Dashboard
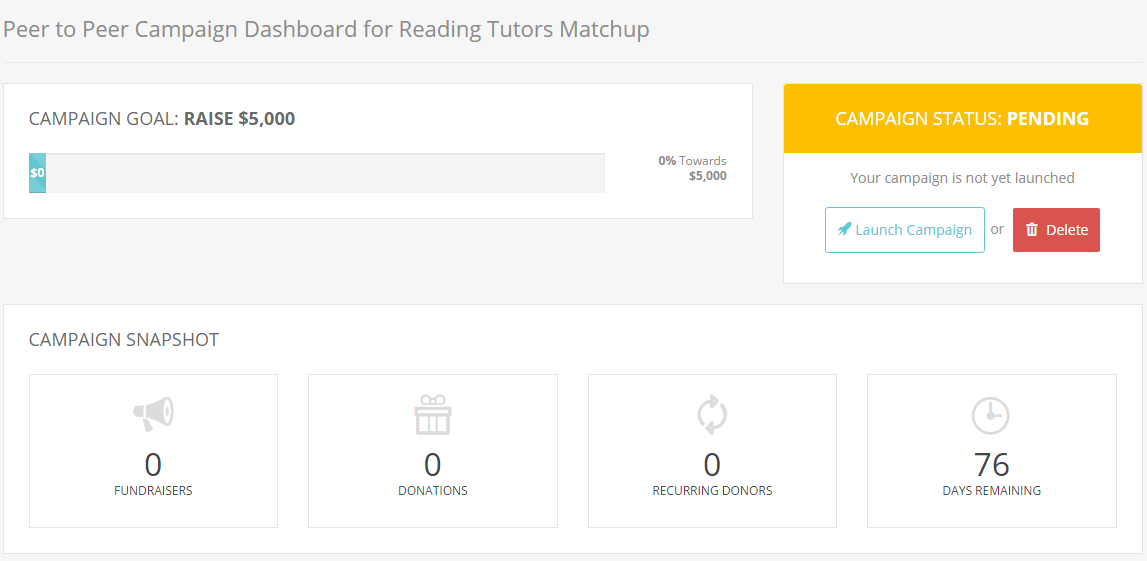
When you complete the setup wizard, you should land on the campaign dashboard. This is the “home base” of your campaign’s back-end. Everything you do as an admin on the campaign will start here. From here, you can:
- Edit your campaign landing page
- Approve individual fundraiser pages
- View and edit individual fundraiser pages
- Update the templates you use for recruiting fundraisers and the templates your fundraisers can use to build their pages, ask donors to give, and thank donors
- View vital stats on your campaign
Campaign Snapshot
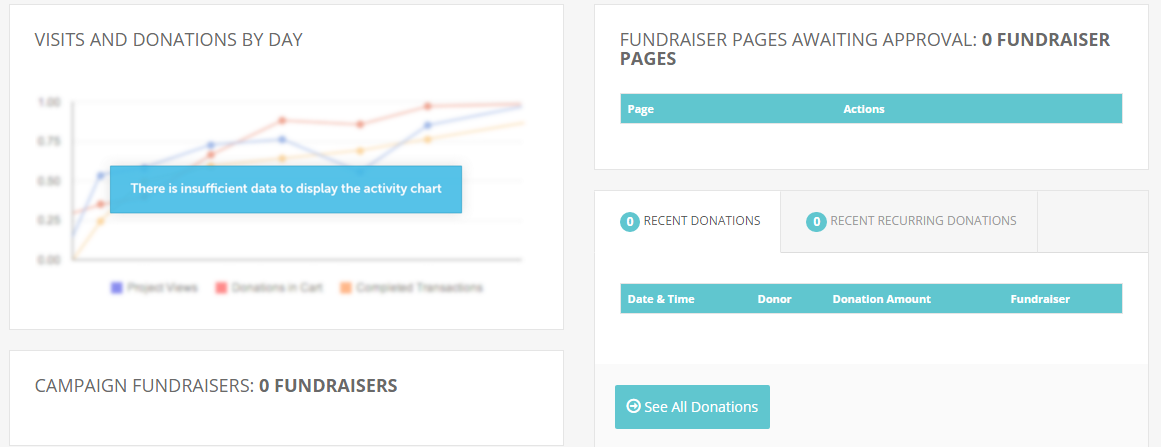
Fundraisers and Fundraiser Pages Awaiting Approval
Main Peer-to-Peer Menu

4. Editing a Campaign
You may want to edit the following parts of your campaign:
Campaign Landing Page
To edit the image, copy, or donation form settings of your campaign’s landing page, click Edit Campaign in the gray menu bar that appears at the bottom of the campaign dashboard.
An Existing Individual Fundraiser Page
To edit an individual fundraiser’s page, which has already been approved, look for the campaign under the Campaign Fundraisers section of your campaign dashboard. Click the name of the fundraiser to go to their fundraiser’s project overview page. From there, click Edit anywhere on the page. Once you’re done making changes, click Save & exit to publish the changes.
Template for Individual Fundraiser Page
If you would like to edit the template new fundraisers are using to build their individual pages, you can do so by navigating to Fundraiser Templates in the gray menu bar that appears at the bottom of the campaign dashboard. From there, select Fundraiser Template for Personal Fundraising Page. Keep in mind, the template only includes the primary and secondary calls-to-action and the page content section (aka story/description). The image for the template is taken from the main photo used on your campaign’s landing page.
Templates for Recruiting Fundraisers
Edit the email and social post templates for inviting potential fundraisers to participate in the campaign by selecting Tools for Recruiting Fundraisers from the gray menu bar that appears at the bottom of the campaign dashboard. Click the Edit at the bottom of the page. When you are done making changes, click Submit. If you click Cancel, none of your updates will be saved.
5. Recruiting and Empowering Fundraisers
Recruiting and coaching your fundraisers may very well be the most critical part of your peer-to-peer campaign. After all, their success is your success.
How should I invite people to participate in the campaign?
Who you choose to recruit as fundraisers will dictate how you reach out to them. Maybe your fundraisers are program staff or board members. If that’s the case, you might simply call a kickoff meeting and assign everyone the task of starting a fundraiser campaign. Maybe you’re relying on volunteers, alumni, or regular donors. For these folks, you may need to formally invite them to start a fundraiser via email. For these folks, the email template for recruiting fundraisers is a great place to start!
No matter who your fundraisers are, be prepared to follow up with them, be available to answer their questions, and remember to thank and encourage them along the way. They are just as important (if not more so) than your donors, and they deserve a show of gratitude!
What are the most important things my fundraisers should know?
Make sure your fundraisers know they have access to donor ask and donor thank you templates. They should log in to their fundraiser account to view these. They can do this by clicking “sign in” on the main peer-to-peer campaign landing page.
Your fundraisers should know how and how often you expect them to reach out to their networks. If you want them to write an appeal that details their own reasons for supporting your organization, encourage them and give them ideas for how to express that! Of course, it’s up to you to decide what level of involvement to have with your fundraisers’ campaigns.
If your fundraisers are thanking donors themselves, they may need you to send them a report on who has donated, along with the donors’ email addresses.
For more tips on planning and running a great campaign with your fundraisers, check out our full Peer Fundraising Campaign Planner.
6. The Approval Process
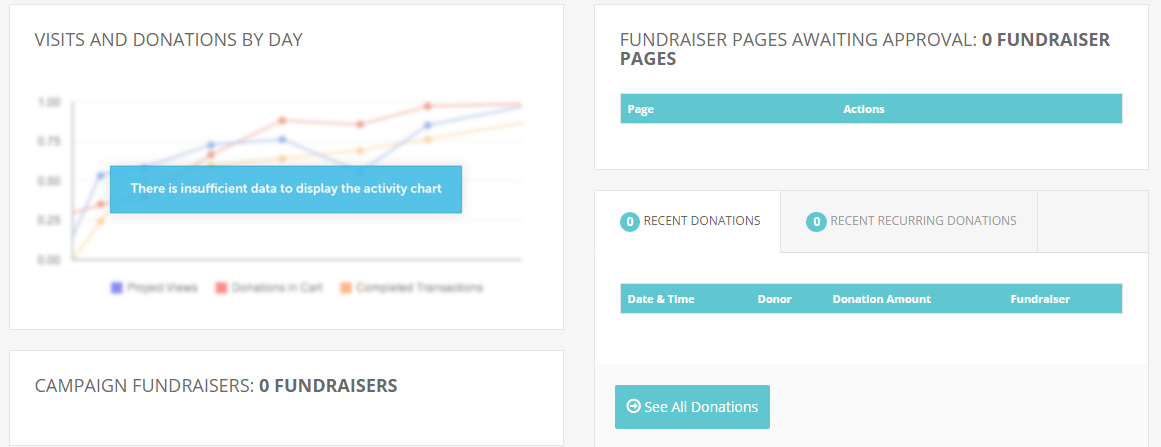
Before any fundraisers create pages and submit them for approval, your campaign dashboard will look like this:
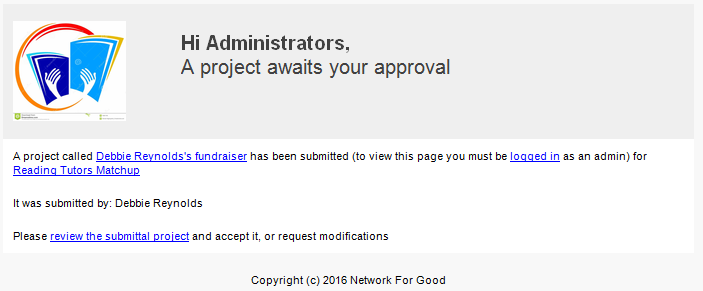
When a fundraiser submits a page for approval, administrators on the account receive the following notice via email:
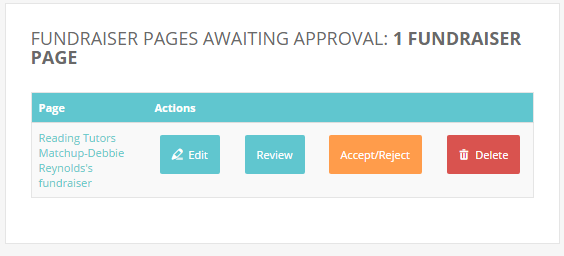
The section Fundraiser Pages Awaiting Approval will also be populated with your fundraiser pages pending review.
You can preview the page by clicking on the hyperlinked title (below: “Reading Tutor’s Matchup-Debbie Reynold’s fundraiser”) or the button Review.
You can edit the page by clicking Edit. You can approve the page by clicking Accept/Reject.
You will then be prompted to select Approve or Request modifications and to leave a note for your fundraiser. The fundraiser will receive an email notice with an update on the status of their page, as well as your personal note. The note section is a good place to include additional instructions and/or a message of gratitude or encouragement. (For example, you may want to provide them explicit instructions for accessing their fundraiser account, editing or sharing their page, and using their donor ask and donor thank-you templates. See Appendix A: Sample Instructions for Fundraisers).
7. Bringing It All Together
Before you sit back, relax, and wait for the dollars to flow in, review this checklist for campaign readiness:
- Do you like how your campaign landing page looks? Did you review all the copy on it?
- Do you have a plan for recruiting, coaching, and thanking fundraisers? How will you motivate them to start a fundraiser? Support them if they need help? Coach them on being active and motivating donors? Consider creating a communication plan.
- If you are using the template for recruiting fundraisers, have you thoroughly reviewed and edited it? Are you going to personalize it for each potential fundraiser?
- Have you reviewed and edited the templates available to your fundraisers? Do you have a plan for encouraging your fundraisers to use them actively (see Appendix A: Sample Instructions for Fundraisers)?
- Do you have a plan to implement partway through the campaign in case your fundraisers don’t see much success at the start?
8. Tracking Fundraiser Success: Reports
One of the coolest features of the account is the Fundraiser/Project Summary Information report. This report can help you run a really effective campaign. If you are recruiting a large number of fundraisers (more than, say, 12), this report is especially helpful.
The report lists each fundraiser’s name, email address, personal fundraising page URL, as well as stats like page visits, number of donations, percent to goal, and even the last time they logged in.
Some ideas for using this report:
- Grab all your fundraisers’ emails at once to send out mass communication;
- Check in with fundraisers who don’t seem to have shared their page with anyone (no page visits)
- Check in with fundraisers who haven’t been active using their templates (haven’t logged in since they created their page);
- Identify which fundraisers are doing well (meeting their goals, have a lot of page visits/donations/high conversion rate) and ask them to share tips on what’s been working well for them.
9. Notifications
You will receive notice of donations made to any project within the peer-to-peer campaign through your donation summary emails, which are sent early morning the day after donations are received.
Your fundraisers will receive an email notification when they’ve submitted their page for approval and when you’ve approved their page. The latter will include whatever note you choose to add when you accept the page.
You may receive a notification that a fundraiser page has a status of pending. This means the fundraiser got to the end of the fundraiser page build process, but they did not complete the process by clicking “submit for approval”. This page will not appear on your campaign dashboard. Reach out to the fundraiser and make sure they know to go back and submit their page for review.
As of now, fundraisers do not receive notice of donations.
Appendix A: Sample Instructions for Fundraisers
You may want to provide additional guidance for your fundraisers. After all, the more resources they have, the more successful they will be in bringing in support for your organization!
Below are some sample instructions for accessing their account and the templates that can be found there. Feel free to adapt them as needed. You can send these in the Notes section when you approve your fundraisers’ pages or include them in a separate email to your fundraisers (recommended).
Thank you for starting a fundraiser!
Now that you’ve created your page, you can share it with family and friends, as well as access templates for asking donors to contribute to your campaign and thanking them after they do. To access these templates, follow these instructions:
- Go to your fundraising page. You can find the link in the page approval notice email.
- Sign in using the link in the top-right corner. (You created your login credentials or logged in via Facebook when you first set up your page.)
- Once you’re logged in, you’ll see a page called “My Fundraisers”. Click on the name of your fundraiser page.
- You should now see a preview of your page. You’ll also see some administration links at the top of the page. From here, you can edit your page, send project updates (subject to approval by the organization), and access templates for asking donors to give and thanking donors who do give.
- If you click on “Donor Ask Templates”, you will see a window with text pop up. Copy and paste the text into an email or use the social post template for a less formal, mass “ask”. Feel free to personalize your message or write your own entirely.
- After a donor gives to your campaign, you will receive an email notification with their name, email, and donation amount. Make sure you reach out to these donors, thanking them for their gift. Feel free to use the “Donor Thank You” template in your account or write a personal note to the donor.
That’s it!
|
Still have questions?
Contact our Customer Support team:
help@networkforgood.com
(888) 284-7978, option 2
Monday-Friday, 8am-8pm ET
(except holidays)
|
|
|---|


